How To Configure Outlook / Windows Live Mail Client
If you like receiving/sending email from Outlook, or a similar desktop email program, you can easily set this up. You can get the setup details for your email accounts from your web hosting control panel, cPanel. For individual email accounts (where there is not access to all email accounts on your website), skip to step 3, "**For Individual Email Accounts Acess" section.
1) Login to your web hosting control panel (refer to logging into cPanel tutorial here).
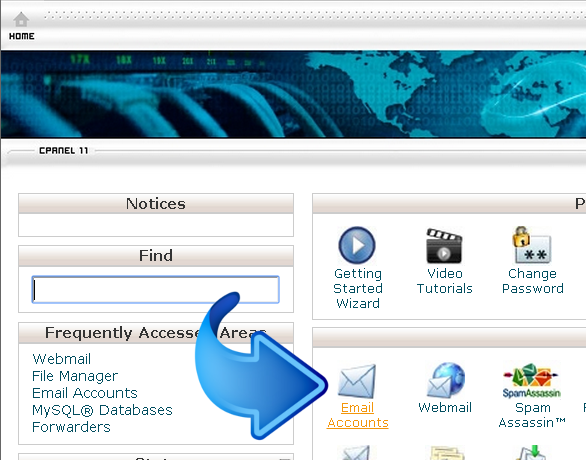
2) From your web hosting control panel, click on the "Email Accounts" link/icon:

3) Here, scroll down the page to the list of your created email accounts.

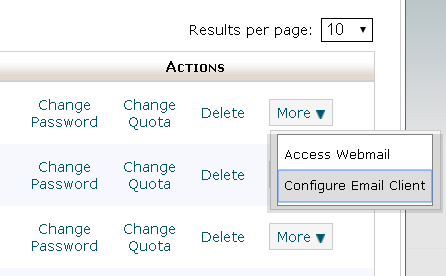
Click on the "More" menu, as shown with the blue arrow in the screenshot above. The screenshot above actually shows the screen right after creating the email address "test@sample-website.com", with the email account confirmation message, and then right below that the list of email accounts including the one just created.
The "More" menu will expand out, with the option to "Configure Email Client" - click on that:

**For Individual Email Accounts Acess: You can also acceess the next page by logging into your indidual email account, as described in step3 of the tutorial, How To Access Your Website Email Online. Namely, login to the url https://[your-domain-name.com]:2096 . Enter in that individual email account username/password.
And then on the next page, click on the bottom-left "Configure Mail Client" link/icon.

4) On this page, there are options to click on to automatically configure your email client:

and also, if you scroll down this page you will find the settings to manually configure your mail client:

As stated on the Notes section of this page, we recommend using POP3 over SSL/TLS or IMAP over SSL/TLS since they provide increased security for your interactions with the remote mail server.
5) Now if you like doing your mail configuring manually like we do, microsoft has a great tutorial on that here.
B)
Configure Website (1)
SEO Tool & Tips (1)
Stylize Website (1)
Responsive App (2)
Content Management (9)
Photos App (5)
Mosaic Grid App (1)
Password Protect, Members Restrict Acess (1)
Members & Social Networking App (17)
Social Login & Meta Tags (5)
Comments & Ratings App (5)
Page/Upload Likes & Unlikes App (1)
Page/Upload Shares App (1)
Timeline App (1)
Mailing List App (5)
Contact Form App (1)
E-Commerce App (10)
HTML Ad(d)s App (1)
Ad(d)s App (1)
Docs App (1)
Feeds App (1)
Backup Database Tool (1)
Custom Coding (1)
Sitemap Generator Tool (1)
RSS Feed Generator Tool (2)
Custom Internet Browser Favicon (1)
Admins & Moderators Management (1)
Multi-Language Website, Multiple Configurations (3)
Articles App (1)
Forms & Surveys Builder (1)
Polls App (1)
Calendar Events App (2)
Credits App (1)
Rewards App (1)
Listings Directory App (5)
Classifieds App (1)
Message Boards (Forum) App (1)
Scrapbooks App (1)
Photo Uploads App (2)
Video Uploads App (1)
Audio Uploads App (1)
File Uploads App (1)
Site Maintenance Redirect App (1)
Web Hosting Control Panel (11)


 Report a concern
 Add Comment